Why build a sprinkler controller with dog detection? Well, a year prior to starting this project, our family took an extended vacation for the first time. Given we would be out of town and our neighbors who keep an eye on our place when we travel would also be traveling, I was made aware a video surveillance system was needed for piece of mind. I installed a blink camera system from Amazon, which has been effective, even if the battery life for some of the cameras is a little low. The system worked without a hitch while we were traveling and when we returned home my wife, Jeannine, would use the system to check on some of the events even after we returned. About six months later we redid our front yard including replacing the driveway and landscaping. With our nice new front yard complete with grass around the sidewalk, Jeannine had noticed through the security footage that an increasing number of dogs were doing their business in our front yard and it appeared to be affecting the health of some of the plants. Jeannine took it upon herself to politely approach the neighbors walking their dogs and asked them if they could have their dogs do their business elsewhere. While the majority of people stated they would respect her request, some were duplicitous and others downright belligerent. It’s worth mentioning, our family has nothing against dogs, we in fact have our own. We don’t believe she do her business on someone else’s property, private or public. We’ve trained our dog to do her business in a specific location of our own back yard.
Concept
The original concept would detect when a dog was in the front yard and turn on a high powered “dog whistle” as a deterrent; however, after some pondering we realized the ultimate goal was to change the owners’ behaviors, not their dogs’. So instead of using a dog whistle as a deterrent for the dogs the system would turn on the sprinklers, with the wet dogs being the deterrent for the owners. Note the sprinklers only turn on after a small delay and only direct water on the lawn itself, so for someones dog to get wet they first have to allow it on the lawn and second it has to linger long enough for the sprinklers to turn on. If owners keep their dogs on the sidewalk, there’s no consequence.
Results
Both systems have been running for five months and working reliably. The sprinkler controller is far easier to configure and adjust than its box store bought predecessor. You can check on the interface on a live simulator here. When fixing some of the drip lines, being able to turn on and off the sprinkler valves right from the yard was far more convenient than walking back to the garage to turn it off and on. The dog detector works as intended. The nature of detecting the presence of an object is statistical so there will be some cases where dogs are present and not detected and some cases where the detector mistakes other objects for dogs; however, the vast majority of the time the system makes the right decision. False positives, where the system detects a dog when one is not present, does not represent a significant problem.
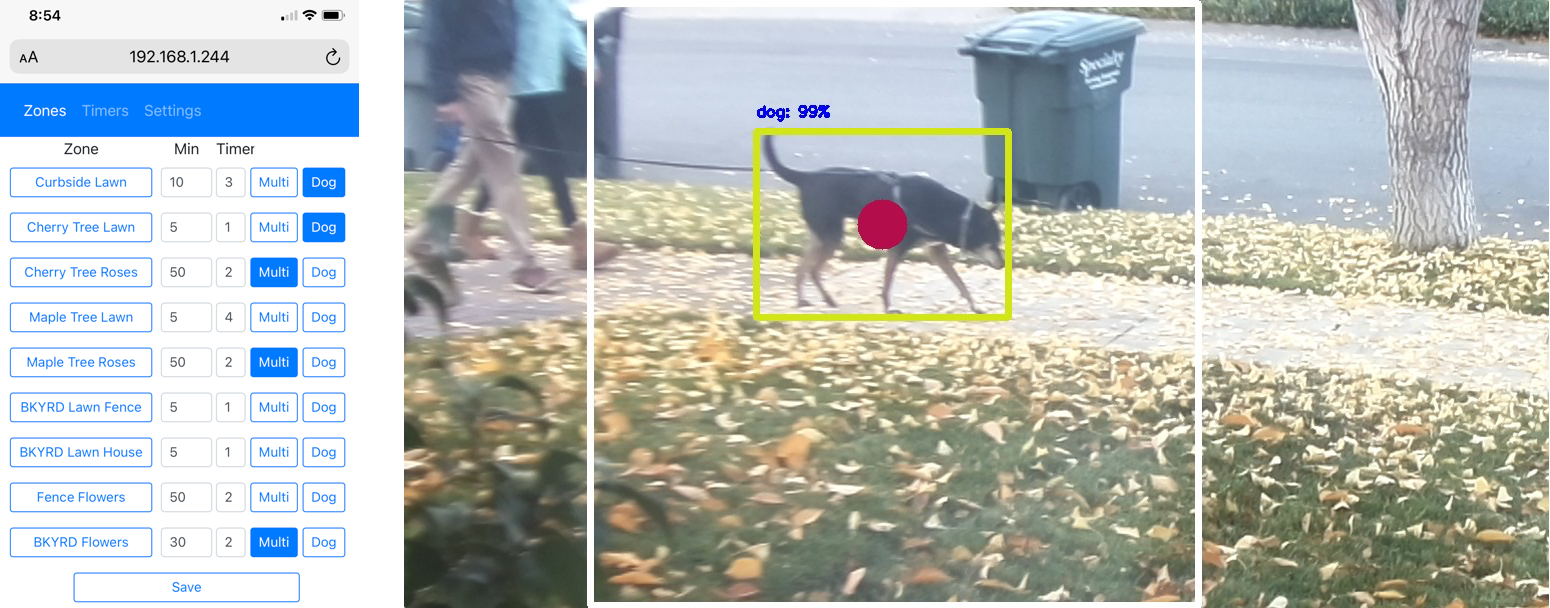
The million dollar questions is: “Does the system change the behavior of the dog owners?”. As it turns out the system is meeting the desired objective, nearly eliminating the number of times dogs doing their business in our yard. The dog owners are apparently very trainable. I’ve included a couple of screen shots below and an amusing video. The white boxes in the images represent the portion of the image the motion detector has determined should be supplied to the detection algorithm. The first image is a pretty easy win for the detector, the second image is pretty impressive in how the detector determined the presence of a dog, even when obscured.
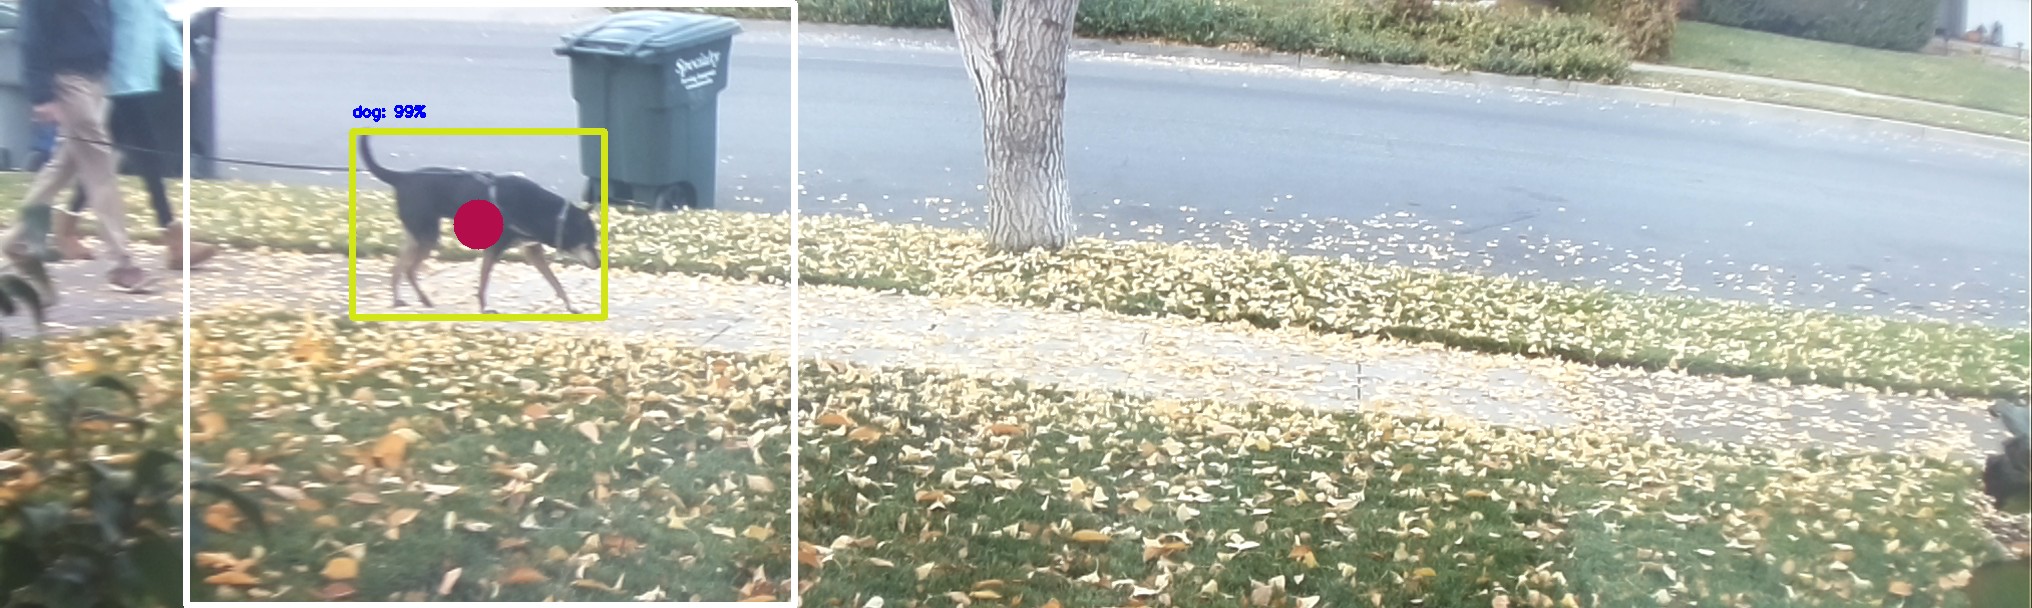
Detection with 99% Confidence
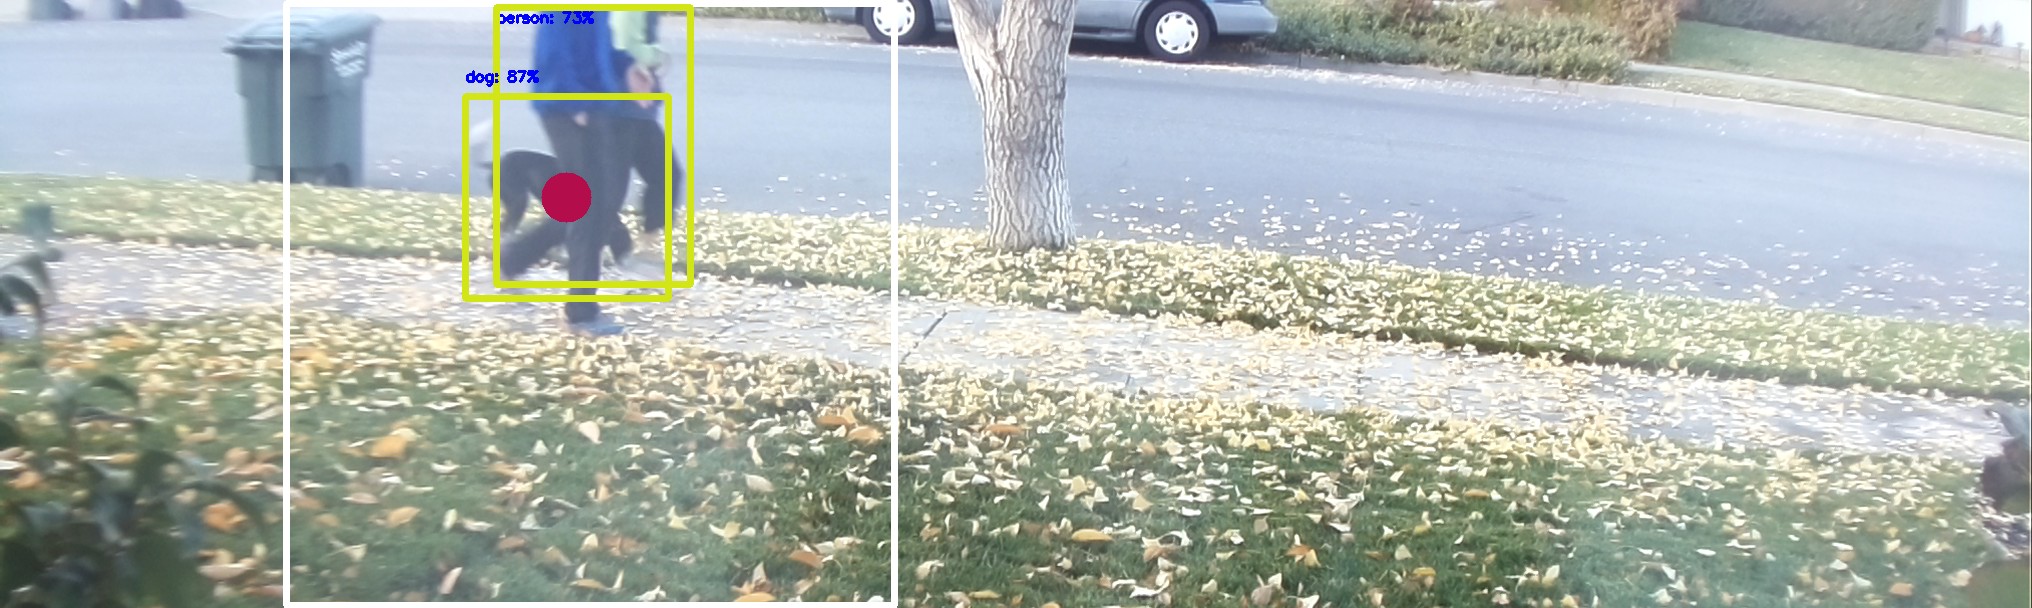
Detection when obscured – 87% Confidence
Here is the aforementioned video of the system in action. Jeannine spoke to this woman previously and she committed to not have her dog do its business in our yard anymore. So much for honesty. In this case the detector is initially “distracted” by the person walking on the sidewalk only switching its focus to the woman and her corgi after they have left the frame.
Implementation
The following sections with their references should be sufficient for building an equivalent system. The implementation consists of two systems, one for detecting the presence of a dog in the front yard and the second for controlling the sprinklers. Each of these systems communicate with each other over the home’s WiFi network. Power is available at both the monitoring site and the sprinkler controller location. Each of these systems includes an application / thread specific watchdog described near the end of this post. The source code and more detailed technical documentation of both systems implementations can be found on GitHub.
Sprinkler Controller
In addition to supporting the ability to trigger from an message from the dog detection system there were other requirements not supported by existing solutions. And, to be honest, the user interface of available systems are lacking, and most often not targeting mobile display resolutions. With a clean slate for a design the following requirements were considered:
- 9+ zones, with watering times from 1 to 120 minutes
- 8+ timers, with the ability to set by days in the week or an interval number of days
- Manual override
- Enable multiple sprinklers to be turned on at the same time
- A highly responsive JSON server for quickly turning on configurable zones (dog mode)
- Automatic shut off for manually enabled watering (forget feature)
- Robust – must survive power outages and software lock up
- Remain cool enough to operate in a dust proof enclosure (near zero air circulation)
- Dust proof enclosure for operating in a garage environment
The sprinkler controller application runs on a Raspberry Pi 4 with a Sequent MicroSystems set of 8-Relay stackable hats, one relay per valve (watering zone). Links to all of the hardware used to create the sprinkler controller are provided in the Bill of Materials (BoM) list below. The application targets a mobile display as the primary interface for a html based GUI interface; although, breakpoints have been used to improve appearance on larger displays. The styling of the interface is constructed almost entirely from the bootstrap 4 cascading style sheets (css) and javascript. A Python / Flask implementation was a natural choice as it allowed the application to span from web content to hardware drivers for the relay control in a single development environment. The limited non-volatile storage required for maintaining state is done via pickle and the resulting configuration file. Given the Raspberry Pi’s use of NAND flash as NVM storage, an algorithm to reduce the file storage frequency is incorporated such that file storage occurs at a reduced rate versus every time the user changes a parameter on the GUI. The system can support up to 64 zones, limited by the i2c addressing limitations of the Sequent MicroSystems hats, and an “unlimited” number of timers. The system supports manual on / off controls with an auto-shut off feature that prevents the sprinklers from being accidentally left on for an extended period of time. The system also supports designating each zone as a lower water demand zone or “multi-zone”. These multi-zones can be overlapped so they operate simultaneously when on the same timer, enabling simultaneous watering of a set of drip lines (which often have extended watering durations) to be grouped together. As an example four zones can be watered at the same time in 2 hours versus taking 8 hours, allowing for more ideal watering times. The system will also automatically handle any collisions from multiple timers ensuring the watering durations will be respected for all zones even if they collide in time. The system sends an e-mail once a week with a complete list of all the times each of the zones were turned on and off, including the impetus for each event. In the future the design will be augmented to take the weather into account to adjust the watering times.
Hardware Bill of Materials
- Raspberry Pi4 w/ 2GB RAM and Pi4 compatible AC/DC power supply. The RAM usage requirements are between 512MB and 1GB this application could run on any Raspberry Pi version with 1MB of RAM and the 40-pin header. The Raspberry Pi 4 does add value via the improved WiFi range, which is relevant to our installation.
- Sequent MicroSystems set of 8-Relay stackable hat(s). The number of hats can be set in software and currently is set to two. **WARNING** the stand-offs provided with my hats were incorrectly sized and too small. The through hole solder tabs on the 5V supply input on the the first hat installed comes dangerously close to the grounded Ethernet receptacle. Be careful when stacking the first hat on your Pi. If you choose to mount the entire system in an enclosure you will need additional stand-offs so I would recommend buying a set. **WARNING** the silk screen labels for R1-NO and R1-NC are flipped on the version of the board I received.
- Altelix 9x8x3 Polycarbonate ABS Weatherproof Utility Box – this enclosure provides enough space inside the box to accommodate all of the wiring. In addition to being dust proof, this enclosure includes plenty of hardware for mounting / securing wires as they enter/exit the case. See images in the installation section.
- 360 Pcs M3 Male-Female Brass Spacer Standoff & Stainless Steel Screw Nut Assortment Kit
User Interface
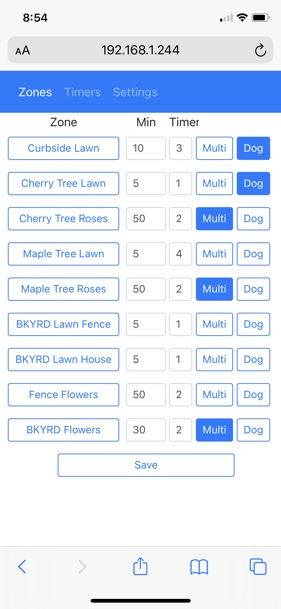
The user interface includes three pages, each designed to fit on a single screen of a mobile display. The Zones page includes the settings which can be applied to each of the watering zones including:
- The watering time
- Which timer which will start the watering for the zone
- If the watering zone is a multi-zone
- If the watering zone is a dog zone
Once configurations have been made the save button will activate the changes. In addition pressing each zone button acts as an on/off switch for that zone., allowing users to control the system remotely, provided they are within WiFi range. A great time saver when maintaining the sprinklers and drip lines.
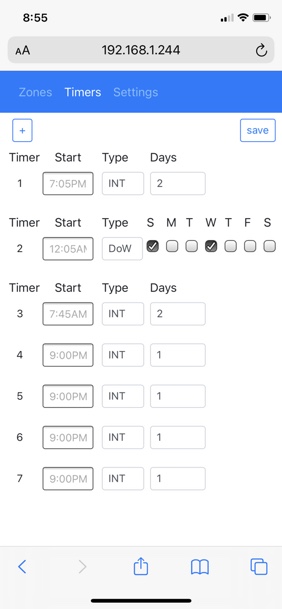
The Timers page includes a list of timers which can be arbitrary in length. Each timer can be configured as either a “Day of Week (DoW) timer in which the user can specify watering to occur on specific days of the week or an interval timer which will trigger the watering every “n” days which is programmable per timer. Adding timers is accomplished by pressing the “+” button. Changes should be saved via the “save” button. The interface has been designed to allow the minimal entry to configure, specifically interpreting all reasonable entries for time of day, including:
- entry in 12/24 hour format automatically detected
- AM PM detection on either A, AM, P, PM.
- Automatic completion of times when minutes are not providedExamples:7:00 AM can be entered as 7, 7:00, 7a, 7A, 7am, 7AM, 7:00a, 7:00A, 7:00am, 7:00AM …7:30 AM can be entered as 730, 730a, 730A, 730am, 730AM, 7:30, 7:30a, 7:30A, 7:30am, 7:30AM …8:30 PM can be entered as 830p, 830pm, 830PM, 8:30p, 8:30pm, 8:30P, 8:30PM, 2030, 20:30
You can try the interface out here.
The Settings page includes the controls not specific to a particular zone or timer. The “All Off” button allows a single button to turn off all sprinklers, regardless of how they have been turned on. The “Dog Mode” button globally enables or disables the turning on of the sprinklers when a dog is detected. Weather adjust enables or disables adjustment of watering times due to the weather. The automatic shut off times set timers that will automatically shut off the water if left on manually, preventing accidental over-watering when manually watering. The limits can be set separately for “Multi-Zone” (drip lines) and “Single-Zone” sprinkler heads.
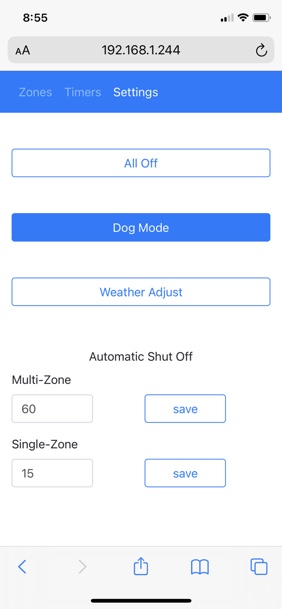
Follow this link to run a live simulator of the user interface. The interface can be viewed on any browser, but is optimized for viewing on a mobile device. The complete repository of the Sprinkler Controller, including a more detailed description of the software implementation can be found here.
Installation and Operation
In order to keep the Raspberry Pi’s WiFi antenna as far as possible away from the wall the boards are mounted with the bottom facing out, which has the Raspberry Pi on the “top” of the image below. To mount the initial standoffs to the case a 1:1 mechanical drawing of the Raspberry Pi mounting holes, was printed onto a sheet label and affixed to the case as a drill guide. Labels for the terminal blocks and wires can also be found on the Sprinkler Controller GitHub repository in the docs directory. Wires originating rom the relay hats are labeled with their relay number and wires originating from the sprinkler solenoids are labeled according to their zone. The wiring junction in the box then becomes a natural relay to zone map.
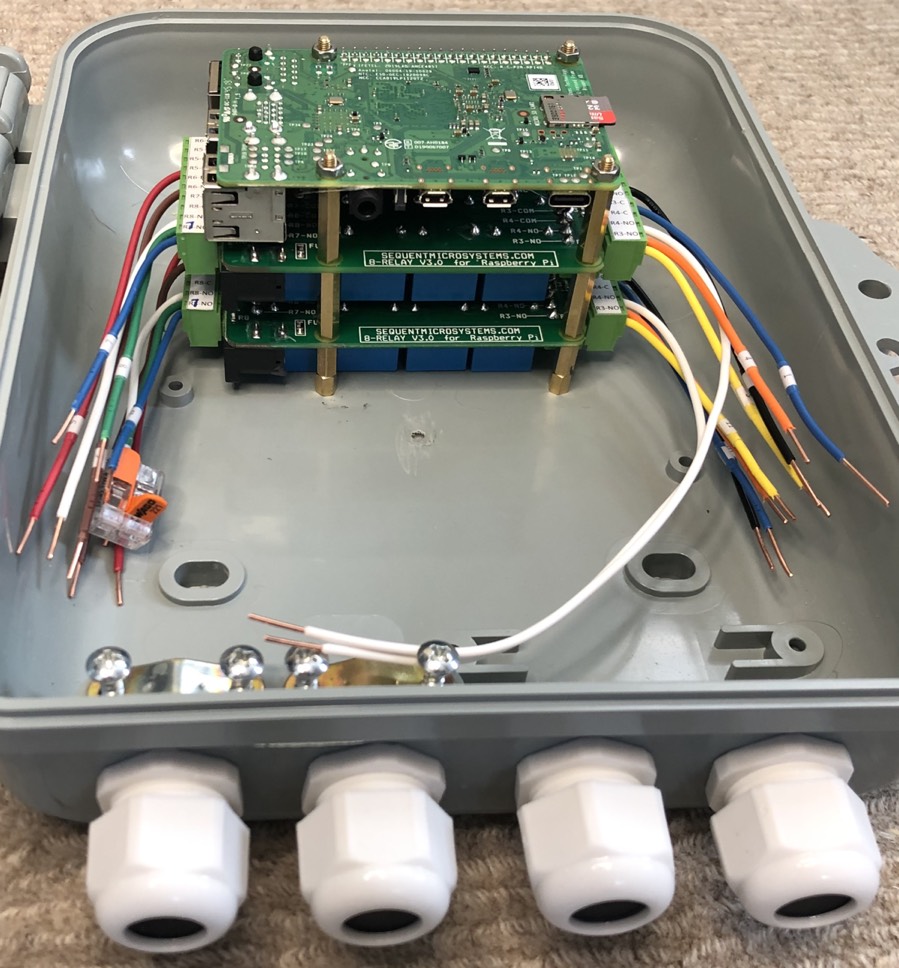
Power consumption, shown in the following image, was taken with all of the relays being energized. The power supply for driving the sprinkler valve solenoids is on a separate supply which is switched through the relays and has no measurable impact on power consumption.
![]()
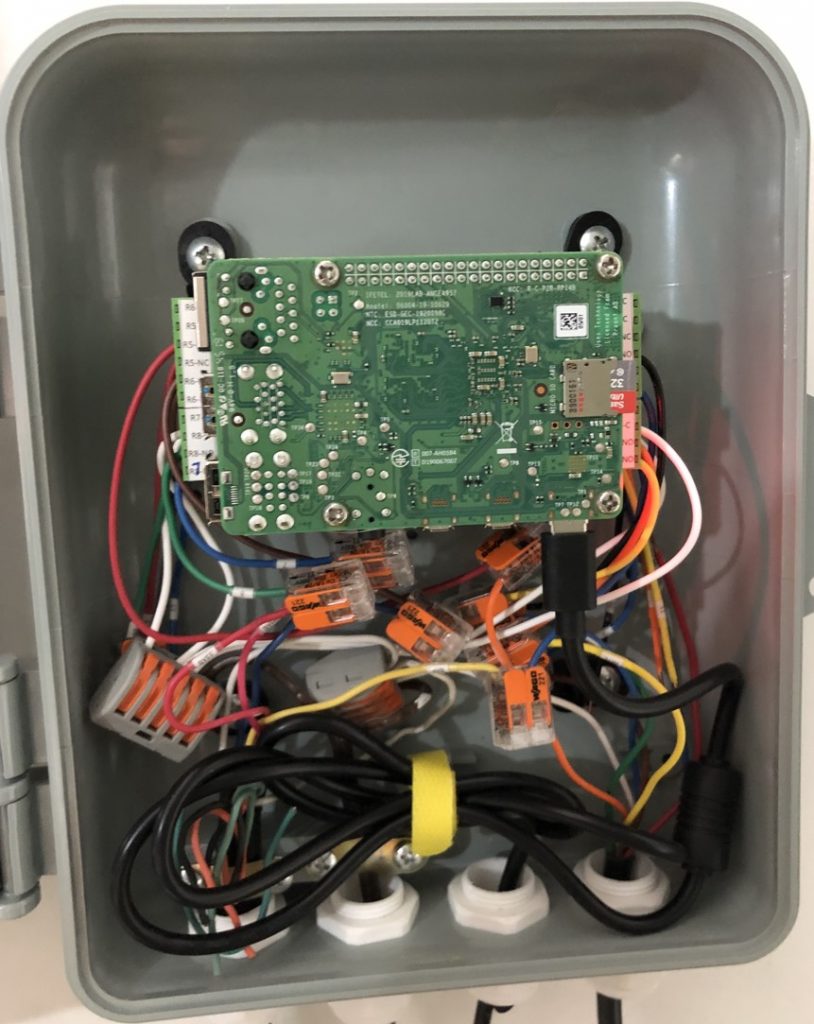
Here’s how it looks when it’s all wired up. The cables coming through the glands are both dust protected and fixed to the enclosure to prevent incidental tugging on the cables from creating an open.
Dog Detector
The dog detector system provides a dog detection application running an a Raspberry Pi with a Raspberry Pi High Quality Camera, and a Arducam wide angle (6mm) lens. This application uses an artificial intelligence implementation to perform object detection and recognition, where the object of primary interest are dogs. Specifically the application incorporates the SSD Mobilnet V2 Single-Shot multi-box Detection (SSD) neural network classifier targeting mobile applications, running on OpenCV. V3 was available during development; however, there appeared to be incompatibility between the .pbtxt definitions and OpenCVs implementation and was not adopted. The goal of the system is as quickly as possible detect the presence of a dog in our front yard, typically on or near the sidewalk and send a notification to the sprinkler controller system on the same network.
When a dog is detected a text, or SMS, notification (without a SMS service) is generated for free and an email with the detection image including the classification bounding boxes and their confidence scores is sent. Targeting a Pi 4, the system uses threading to both maximize the recognition frame rate and avoid messaging and network delays from impacting the frame rate. To maximize the frame rate, a digitally locked loop is implemented where delays are inserted following processing of a frame (in a thread – called a phase in this implementation) to match the average delay of the system. In each phase a captured image runs in its own thread through the object classification (the single most CPU intensive process), such that multiple images have object classification running in parallel, the results for a phase are dequeued immediately after kicking off the phase + NUMBER_OF_PHASES-1. The Pi4 has four cores so there is no benefit in exceeding four phases. In addition the classifier’s computation becomes IO limited, so improvement diminishes beyond 3 phases. The software is designed to support arbitrary number of phases though configuration, enabling hardware specific optimization.
The camera’s viewport is configured to have a wide aspect ratio, reflecting the visual region of interest. The classifier has been trained on a 1:1 aspect ratio and is tolerant to some variance in aspect ratio, but demonstrated significant degradation for a 10:3 aspect ratio. To maximize accuracy motion detection is applied to the image and the object recognition is run on a 1:1 portion (IMAGE_HEIGHT x IMAGE_HEIGHT) centered on the motions centroid. As configured the system has a frame rate of ~2.1 fps.
When running all four cores are typically in the mid 90s% load, so some form of cooling is needed. Given the requirement for near silent operation a passive cooling solution is preferable and the Geekworm Raspberry Pi 4 Case, has proven to be very effective. Unfortunately the need for WiFi range in this application WiFi is important and this case places a large block of Aluminum around the antenna, so the case was modified to create a cutout in the top side metal around the antennas. Peak memory usage is around 3GB so 4GB of RAM would be sufficient; although, I conservatively chose the 8GB prior to having the memory usage data. The application expects a RAM disk @ /var/ramdisk/ to store a cyclical list of captured images.
This is done to:
- avoid wear on the SD card – SD card writes have a real impact on the operating life
- improve the speed performance when needed most
Given the raised operating temperature of the system a night mode has been implemented to lower the power consumption when the image is too poorly illuminated to be useful. The digital lock loop slows down by a factor of ~120 in this mode and object classification is not called with the goal of preserving energy and extending the life of the system (heat has an exponential impact on lifespan in almost everything, electronics included).
Watchdog
Both systems are intended to run stand alone indefinitely and uses the OS supplied watchdog driver to interface to the Broadcom’s (Pi4’s) watchdog timer. The use of watchdogs in Linux operating systems takes on a different context and primary role when compared to embedded systems. In Linux severs the overriding purpose of the watchdog is to prevent bricking of the server itself. Unfortunately, when the original Desbian watchdog solution was implemented the authors created a name space collision between
- the daemon which would monitor other processes within the system and
- the driver take responsibility for either petting the actual watchdog or the software implementing a watchdog function in leu of a HW implementation.
As a result, configurations named WATCHDOG are either for the daemon or the driver; however, I have yet to find documentation clearly delineating between the two. Sensibly, only one SW instance is allowed to connect to the drive at a time, so if the “daemon watchdog” is enabled other processes are locked out from connecting to the “driver watchdog”. The watchdog daemon has been designed to monitor processes at the process ID resolution, resetting the system of services such as network communication cease to operate. Verifying operation via process ID is not effective for a multithreaded application, such as either of these two applications where individual threads within the application need to be monitored. This implementation does not invoke the watchdog daemon; but, rather directly interacts with the watchdog driver, via an os call. For this approach to function the watchdog daemon can not be started at the system level. The Sprinkler Controller and Dog Detection applications implement their own watchdog thread and monitors critical thread(s) with the assumption that if the critical infrastructure relative to the application fails the application will fail with it. The watchdog implementation is such that the watchdog is not enabled until the application reads the ENABLE_WATCHDOG parameter from a configuration file. When it does so it writes a working configuration file to the RAMDISK to allow remote determination of the configuration state. The configuration file provides a safety measure for disabling the watchdog, as deleting or renaming the config file will disable the watchdog the next time the application is started. When first running the application it is recommended to not enable the watchdog.
To start the application following either a loss of power, including a watchdog event, a systemd service is created. See instructions in DogDetect_README.txt on GitHub for installation, enabling and disabling the service

Pingback: LWDW 259: Hairy Hairy Hippos – LinuxGameCast